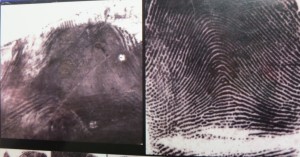
fingerprints

FW: “Have you been fingerprinted?”

August, 2019 note: I had occasion to return to SIRCHIE during MurderCon, a  Writers’ Police Academy event. While the instructors were different, it’s reassuring to note that the science remains the same. Read on for details about gathering fingerprints from paper.


People ask me all the time how I acquire the information needed to write Kerrian’s Notebook.


Simple answer: research. And lots of it.


If the questioners want to know more, I mention the conferences I attend, the reference books I read, the internet sources I’ve tapped into, and the experts willing to chat about their chosen fields. It’s a fascinating part of the job and I love it.


The next few posts will reveal some of the information gathered at a series of classes where I took photos and lots of notes. If you’re a regular follower of Kerrian’s Notebook, you may recognize some of the details mentioned here as having appeared on previous Detective Kerrian’s pages.


For all out fun, I go to the Writers’ Police Academy held in September – this was the 5th year at the Guilford County, NC location (my fourth). It’s a three-day, mind-blowing experience that demonstrates the nuts and bolts of police and fire and EMS procedure – taught by professionals and experts actively working in the field.


Along with several other strands of study, the 2011 WPA conference provided classes in bloodstain patterns, fingerprinting, and alternate light sources (ALS) conducted by Sirchie instructors. Because of the standing room only enthusiasm for these classes, Sirchie offered a five-day Evidence Collection training session for writers at their own complex in North Carolina. Sirchie makes hundreds of products for the law enforcement community and I felt this would be a great opportunity for Detective Kerrian to learn more about the latest and best gadgets being used to catch the crooks.

 I happily sent in my application and plunked down my credit card to hold my space in the class – ten months ahead of time.


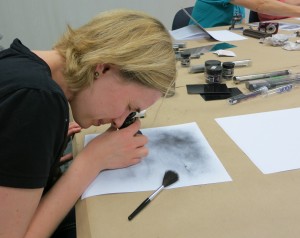
On the first day of classes, our instructor, Robert Skiff (Training Manager/Technical Training Specialist at Sirchie) discussed the ‘CSI Effect’ – the pressure placed by the popular TV shows on real life crime investigation. TV labs and real life investigations bear little resemblance to each other – not in time, or equipment, or budgets. Then we got to work, using the powders and brushes needed to process a crime scene and used by actual techs in the lab.
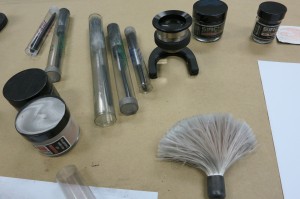
Fingerprint powders, brushes and magnifier

It’s up to investigators and examiners to prove the case against the suspects, using proper evidence collection techniques and tools, because trace evidence is ALWAYS left behind.


Fingerprints found at the scene are still the favored piece of evidence tying the suspect to the crime. These days, using a combination of ingenuity and newly developed chemicals and powders, a crime scene investigator can lift (and/or photograph) prints from many previously challenging surfaces. 


By the way, black fingerprint powder gets all over everything when newbies are handling it for the first time. We must have used 50 wet wipes each during the morning alone.


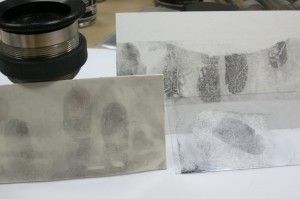
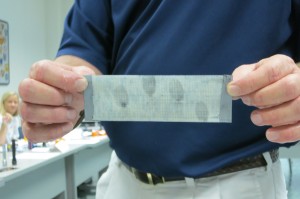
After dusting prints with black fingerprint powder,


they were lifted from various smooth surfaces using (in forefront) a gel lifter, a hinge lifter and (in background) tape.


We had to be careful not to contaminate the powders and jars or smear the samples themselves before looking at the prints under the magnifier. By the end of the day, most of us had black eyes and streaks on our hands and faces. It looks much easier on TV.


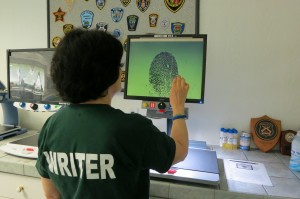
Our prints were photographed and then viewed under an Optical Comparator. This machine can be hooked up to a laptop, and the image sent off to AFIS for identification purposes. No crooks in our crowd, so we omitted that step.


At the end of the first day we left happy, tired, and still wiping powder off our hands and faces. A tip from an investigator taking the class with us: add a cup of vinegar to the wash load to get those powder stains out.


Did I mention that we had loads of fun?


On the second day, Robert Skiff’s assistant for the class, Chrissy Hunter, passed out stainless steel rectangles and we pressed our fingers onto the plates, twice. First time – plain ole print, second time – ‘enhanced’ by first rubbing our fingers on our necks and foreheads to increase the amount of oils in the print. The ridge detail in the prints was so clear in the ‘enhanced’ version that there was no need to process them with powder. We lifted them with a gel lift.


If we were working a real scene, that might never happen, but it could. The usual occurrence is that partial prints are left at the scene and that’s what makes the search for the suspects so much tougher than what the TV dramas indicate. There is no instant ‘a-ha’ moment that comes 45 minutes after the crime has been committed.


The prints are generally sent off to be compared with the millions in the AFIS database, and here’s where TV parts with reality again. AFIS comes back with a list of 10-20 possible matches and someone then makes a comparison by hand of the most likely hits.


After practicing the basics, it was time to move on to fingerprint discovery on documents. There are scheming relatives who forge wills, less than loving spouses who murder for the insurance, bogus suicide notes, and the list goes on. How to prove the nefarious intent? Fingerprints. But…as we discovered the first day, fingerprint powder is messy and almost impossible to clean up. An important document could be destroyed in the search for evidence of foul play. Enter chemicals and alternate light sources (ALS).

There is a protocol for testing with chemicals. If the prints don’t show up with one chemical, then it is possible to try several others, but this can only be done in a certain order:


Iodine

DFO

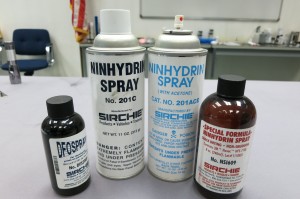
Ninhydrin

Silver Nitrate

MBD


If used in this order, the sample won’t be compromised, even though treated several times over several days. We experimented with several chemicals with excellent results, but for the ‘wow’ factor, I’m showing the ones that look great on camera.  😉
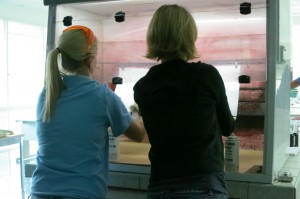
Spraying Document

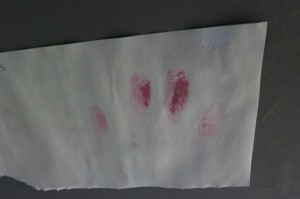
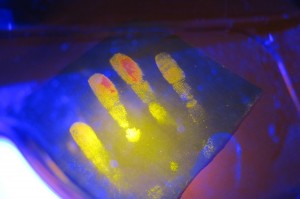
 DFO reacts to amino acids in the prints. We created our samples placing our own enhanced prints on plain white paper. We hung the papers in the fume hood, saturated them with DFO, then put them in the oven to bake for several minutes.

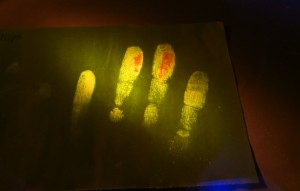
This DFO sprayed, baked sample doesn’t look like much, so it was time to use an ALS to really ‘pop’ the print and make it photo ready.

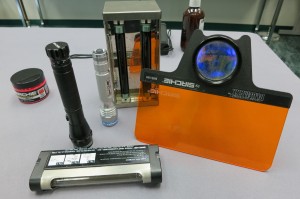
Alternate Light Sources vary depending on the scene lighting and/or need to highlight the evidence. A few used in the field are: the ‘poor man’s ultimate light source’ (a mag light), black lights, UVC lights, lasers, LED lights, Ruvis lights (cost about $20K), and pure white lights. Each has a specific quality that the investigators can tap when needed.

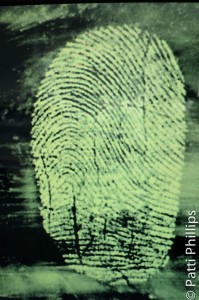
After we sprayed our samples with DFO and baked them in the oven, we darkened the room, and put on orange plastic glasses. Then we side-lit the sample with a 455nm light. The photo was taken at that point.

Same sample, side-lit at a slightly different angle. Photo taken through an orange filter.


Ninhydrin, the third chemical group in the list to be used if nothing has shown up yet, comes in several forms: acetone, zylene and Noveck.  Ninhydrin reacts to another set of amino acids and likes warm, moist air. If a sample is being saved overnight for processing, you can place it in a ziplock bag, blow into it, then seal it and still maintain its integrity.


Before working with any chemical, it’s a good idea to make copies of the document. Why are there different kinds of Ninhydrin? Zylene will run some inks. Acetone will run all inks, all the time. Ooops! There goes the document if you grab the wrong chemical, so copies are definitely necessary. Noveck is the clear winner when working with inks. It gets fast results and dries quickly. Additionally, it can be sprayed on an outer envelope to reveal what’s inside. Without damaging either piece of paper. Very cool.
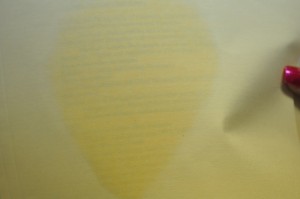
Ninhydrin-Noveck sprayed on outer envelope


You could see the plots developing in our writerly minds as the Noveck dried and the words inside the folder faded from view.


*Photos taken by Patti Phillips at the Sirchie Education and Training Center in Youngsville, North Carolina.


FW: “Have you been fingerprinted?” Read More »

FW: “Quick! Grab the glue gun!”


Continuing
the series
of articles about Evidence Collection Training Classes held at SIRCHIE.

Part 4 – “Quick! Grab the glue gun!”


Wet Lift Print as seen on a Comparator

We often hear it said on TV and in the movies that there are items and surfaces that do not hold fingerprints or that fingerprints cannot be recovered from them. On Day #4 of the Sirchie Evidence Collection Training Classes held at the Sirchie Fingerprint Laboratories in NC, we experimented with a variety of surfaces to see what would happen if…


Skin is reported to be one of the most difficult surfaces from which to lift a print, because the prints fade so quickly. But, after three days of dusting and chemically treating and lifting and photographing dubious fingerprints, our group of dogged writer/investigators was not to be deterred.


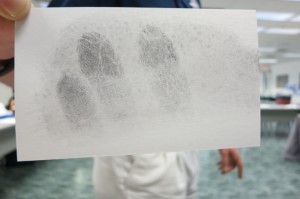
The set of prints in the photograph below were lifted from an arm. Not clothing, the arm itself. And not by using fingerprint powder on the arm. A classmate kindly offered up her arm to be grabbed. Then a piece of specially treated paper (chromicoat) was pressed onto the area of her arm where the fingerprints were likely to be found. That paper was then dusted with fingerprint powder and the prints popped up. We now knew it was possible to lift the prints if they were minutes old, but we had access to both the specially treated paper and the powder immediately after the grab. We also knew from experience that our grabber always left really good prints on all the surfaces touched during the previous days.


Lift from skin using Chromicoat treated paper

We proposed various scenarios to our instructor (equally curious Robert Skiff, Sirchie Training Manager/Technical Training Specialist). What if a mugger grabbed a bare arm and tried to drag us into an alley? How close would we have to be to the police station after we got away from the mugger in order to get the prints processed? How much time did we have before they faded away? Would the lift work if we used plain paper, since it was highly unlikely that an ordinary gal would be carrying chromicoat paper in a pocket? What if the police station wasn’t close by, therefore no access to fingerprint powder?


The answers were time sensitive. It was possible to lift prints from a bare arm with plain paper, but only if the lift was made during the first few minutes and only if the suspect left a strong sample. It’s possible to use cigarette ashes as a substitute for the fingerprint powder. Conclusions? There were too many variables for this to be a reliable way to catch a crook. Now…if you were grabbed around the corner from a police station OR were a smoker AND the mugger had dirty hands AND you had a clean piece of paper in your pocket AND you had attended this class… Hmmm…maybe in a sci-fi mystery. However, not completely impossible.


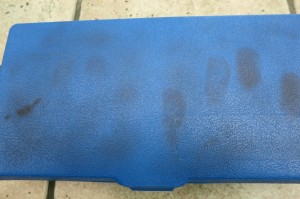
Another difficult surface from which to lift prints is the dashboard of a car. Think about it. If you press your hand onto a dashboard, your skin (with all the loops and whorls and arches) is also pressing into the crevices of the pebbled surface. Same thing is true for an orange or a football. A straight gel lift or hinge lifter will not do the job effectively. A tape lift may only pick up the top of the print.


Dashboard surface


But, the investigator sees the possible print and doesn’t want to lose the opportunity to catch the crook. The answer in the past was to dust the likely area with magnetic fingerprint powder, then apply a Blue Glue gel and wait for the gel to cure before lifting it off the dash – about five hours. FIVE hours? The crook is getting away! No time to wait!


These days, the preferred lifting product (after applying the magnetic powder to enhance the print) is a transparent liquid silicone (PVS200 – polyvinyl siloxane), applied with an extruder gun. It flows down into the crevices, dries in six minutes, and gets into every bit of the print. After the polyvinyl dries, it can be lifted, and then placed on a backing card to preserve the print. At that point, it can be placed under an Optical Comparator, photographed, and sent off to AFIS for an ID/comparison.


This epoxy is not good for every surface (it rips paper, etc) but is very good for pitted, bumpy surfaces like alligator skin and dashboards. Gotcha!


Dashboard Lift


Another tricky scenario: The cop is in pursuit of an unidentified car thief or robber and chases him through a parking lot.  The cop witnesses the suspect firmly planting his palm on the trunk of a car as he cuts through a tight space. The cop grins as he realizes that even if the guy outruns him, he can catch him through the palm print. And, then, it starts to pour. Does the print get washed away? Or become unusable?


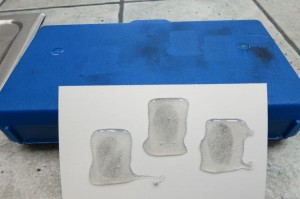
Not if the Field Kit is handy! When forced to do a wet lift, it is possible to use SPR (Small Particle Reagent – finely ground particles suspended in a detergent solution). Spray the print with a fine mist of SPR and let set. Lay the hinge lifter just off the print and place it down carefully, employing a squeegee at the same time, to slowly remove the excess water. This method can be used to develop prints on non-porous surfaces – cans, bottles, windows, and other glossy surfaces, but not on paper or cardboard.


Wet Lift Prints


Criminals who tie their victims up during the commission of a crime frequently use duct tape for the job. That duct tape is almost always full of prints that get embedded into the tape. It’s practically impossible to manipulate and tear the tape while wearing gloves (I tried this once and the gloves got so stuck to the tape that I threw the resulting mess away), so he leaves prints while unrolling and tearing the tape. Even if he has wiped the smooth surface of the tape clean to cover his identity, the sticky side can’t be wiped without taking away the sticky. Balls of tape tossed aside by a suspect have been processed successfully for prints, but first the tape had to be released from itself.


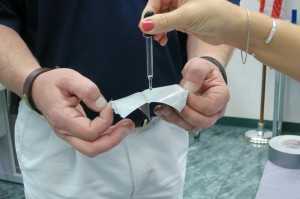
Separating folded duct tape from itself

A 2% chloroform tape release agent is dropped liberally on the area where the two pieces of tape meet. Two people need to work together on this – one person places the drops continuously while the other person pulls the tape apart. The ends of the tape are folded over (about ¼”) and the tape is flattened for 24 hours before further processing.


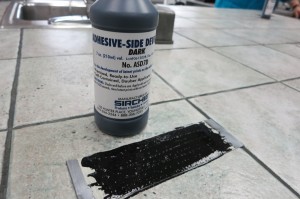
Adhesive-side developer

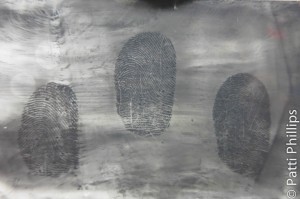
After 24 hours, adhesive-side developer is applied to the sticky side of the duct tape, allowed to sit for a few minutes, then rinsed off and voila! The prints are clearly visible, can be photographed, covered with clear tape to protect them, viewed under the Optical Comparator, entered into the system, and sent off to AFIS.  (Crystal Violet can also be used for processing this type of print, but is toxic and should only be used in a lab.)


Duct tape prints


AFIS – what is it and does it really help identify a person of interest in a crime?


Anyone who has watched TV crime shows during the last decade has heard the acronym AFIS. It stands for Automated Fingerprint Identification System.  In 1924, the FBI started a fingerprint identification system. They fingerprinted several thousand prisoners incarcerated at Leavenworth, and stored their prints on cards.


As of 2012, the system had broadened to include international prints as well, is an electronic database of 70 million, and contains the prints of both law-abiding citizens as well as those of criminals. While newborn babies are printed, their information is usually entered into a local system unless needed in an abduction case. Real estate agents, childcare workers, Federal employees, and people seeking employment with security and law enforcement agencies are fingerprinted as a matter of course now. Depending on the State, the prints are entered into the State AFIS system, and held until needed in the national system. The fingerprints of any person arrested for any level of crime are sent to the State and then on to the national FBI database. The latest FBI version is named IAFIS (I is for Integrated).


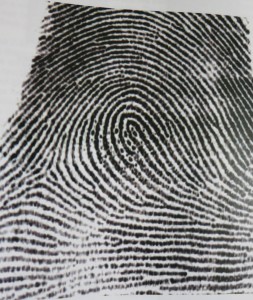
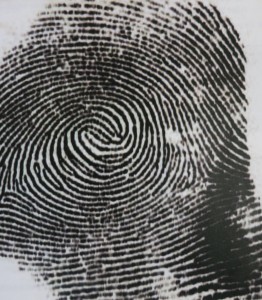
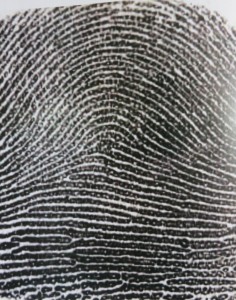
Johnny Leonard, a latent fingerprint expert, visited the class in the afternoon to explain what AFIS can and can’t do. He showed us what a fingerprint examiner looks for in every print or partial print he/she sees, using the Henry Fingerprint Classification and Identification method. The average number of minutiae on every complete print is between 100 and 150. There are distinct ridge patterns to look for in a print: arches, loops and whorls.


Fingerprint Loops

65% of all fingerprint patterns are loops,


Fingerprint Whorls

30% are whorls,


Fingerprint Arches

and only 5% of fingerprint patterns are arches.


Thumb prints are the prints most often left at a crime scene, because people use their thumbs for leverage when pushing through doors or opening safes, or grabbing those golf clubs to use as weapons, etc.


Identifying 8-12 points of similarity between an unknown latent print found at a crime scene and one in the AFIS database is the standard for declaring a match, but some jurisdictions want more for absolute certainty.  An examiner plots the print in question for distinct characteristics, makes notes to that effect before sending the print off and waits. AFIS & IAFIS return a list (sometimes as many as 30) of possible matches. At this point, the examiner reviews the possibles and chooses the best match in his/her opinion. And, it might not be the first on the list. Then, another examiner verifies the possible match. There is no such thing as an instantaneous match with just one print from the AFIS or IAFIS databases. TV tells us otherwise, but sorry, that’s merely for dramatic effect.


Other interesting fingerprint details:

*We know that no two people can have the same fingerprints, but not even the same person’s prints are identical.

*Some people have all three types of ridge patterns on one finger.

*Only positive matches from the state AFIS are verified by examiners; not the negative ones.

*Palm prints are now in the AFIS database.

*AFIS looks for change of direction in the whorls, loops, and arches in order to find a match.

*There has not been a case yet where the DNA has not matched the fingerprints at the scene.


The photo below shows a positive match between a latent print and one in the database. The latent is on the left. The database print is on the right. This match placed the suspect at the scene and along with other evidence, resulted in a conviction.


AFIS match


Having been through four days of training, working with prints on a variety of surfaces, we felt confident that we were up to the challenge of matching a few fingerprints on our own. Mr. Leonard showed us 16 pairs of prints and gave us 15 minutes to make decisions. We looked for cluster highlights, tented arches, spots, bifurcations and other techy details. Guess what? The lines began to blur, and not all of us correctly identified all the matches.


TV makes it look easy, with a click and a less than five-minute response time from IAFIS. Not possible, with 70 million fingerprints to choose from. This is not an easy job, even with the new digital readers that speed up the process of finding likely matches at the scene.


Click here for Part 1 – “Have you been fingerprinted?”

Click here for Part 2 – “Where are the Evidence Collection kits made?”

Click here for Part 3 – “Can’t get rid of the blood?”


*Photos taken by Patti Phillips at SIRCHIE Education Training Center in Youngsville, NC.


FW: “Quick! Grab the glue gun!” Read More »

KN, p. 76 “Save the duct tape and glue the dashboard!”


Criminals that tie their victims up during the commission of a crime frequently use duct tape for the job. That duct tape is almost always full of prints that get embedded into the tape. It’s practically impossible to manipulate and tear the tape while wearing gloves (I tried this once and the gloves got so stuck to the tape that I threw the resulting mess away), so the crook leaves prints while unrolling and tearing the tape. Even if he has wiped the smooth surface of the tape clean to cover his identity, the sticky side can’t be wiped without taking away the sticky. Balls of tape tossed aside by a suspect have been processed successfully for prints, but first the tape had to be released from itself.


Separating folded duct tape from itself

What to do? Drop lots of a 2% chloroform tape release agent on the area where the two pieces of tape meet. Two people need to work together on this – one person places the drops continuously while the other person pulls the tape apart. The ends of the tape should then be folded over (about ¼”) and the tape flattened for 24 hours before doing anything else to it.


Adhesive-side developer

 After 24 hours, adhesive-side developer should be applied to the sticky side of the duct tape, allowed to sit for a few minutes, then rinsed off. The prints are clearly visible, can be photographed, covered with clear tape to protect them, viewed under an Optical Comparator, entered into the system, and sent off to AFIS.


Duct tape prints


Dashboard prints:

Up until recently, we could not collect decent prints from the dashboard of a getaway car in a reasonable length of time. Most car and truck dashboards have a slightly bumpy surface, more or less because it’s a selling point to non-criminal types – supposedly the pebbled surfaces mean no more pesky fingerprints to clean off if you’re a mom transporting kids after school. Sheila says the juice spills just get buried in the grooves.


But, it’s a potential fingerprint heaven for the CSIs who need to process the abandoned bank heist car. Think about it. If you press your hand onto a dashboard, your skin (with all the loops and whorls and arches and oils) is also pressing into the crevices of the pebbled surface. The problem is that a straight gel lift or hinge lifter will not pick up the prints effectively or may only pick up the top of the print.


Dashboard surface


 But, the investigator sees the possible print and doesn’t want to lose the opportunity to catch the crook. The answer in the past was to dust the likely area with magnetic fingerprint powder, then apply a Blue Glue gel and wait for the gel to cure before lifting it off the dash – about five hours. FIVE hours? The crook is getting away! No time to wait!


These days, the preferred lifting product (after applying the magnetic powder to enhance the print) is a transparent liquid silicone (PVS200 – polyvinyl siloxane), applied with an extruder gun. It flows down into the crevices, dries in six minutes, and gets into every bit of the print. After the polyvinyl dries, it can be lifted, and then placed on a backing card to preserve the print. At that point, it can be placed under an Optical Comparator, photographed, and sent off to AFIS for an ID/comparison.


This epoxy is not good for every surface (it rips paper, etc) but is very good for pitted, bumpy surfaces like alligator skin and dashboards. Gotcha!

Dashboard Lift


Planning to become a crime scene investigator? Then remember to collect the balls of duct tape tossed on the floor or in the garbage cans at the crime scene. Almost definitely, a great source for prints. And don’t forget your extruder gun!


*Photos taken by Patti Phillips at the Sirchie Education and Training facility in Youngsville, NC.


For more information about Sirchie and its products for the law enforcement community, please visit www.Sirchie.com.


KN, p. 76 “Save the duct tape and glue the dashboard!” Read More »

Scroll to Top